At Nimbus Engineering, we are developing some of our applications for rapid data visualization using the Streamlit tool. Streamlit is essentially a powerful, open-source Python library that simplifies the process of creating and sharing beautiful, custom web apps for data analysis. Here, you can check other features of Streamlit. In this blog, we will explain the initial requirements for creating our First Setup of Streamlit using VSCode, as well as provide a folder structure that will allow us to create an organized project. This will enable us to develop our Streamlit applications in conjunction with Snowflake.
Prerequisites
Before diving into the setup of a Streamlit app in VSCode, there are a few prerequisites that need to be addressed. Ensuring these elements are in place will provide a smooth and efficient development experience.
- Installing Python: Streamlit is a Python-based framework, so the first step is to have Python installed on your system. It’s recommended to use the latest version of Python to take advantage of recent features and improvements. You can download and install Python from the official Python website.
- Create a folder with the name of your project.
- Creating a Virtual Environment. (create it in the project folder)
- Installing Streamlit: run the command, with the virtual environment activated,
pip install streamlit, command will install Streamlit and its dependencies in your virtual environment, setting the stage for you to start developing your Streamlit app.
Setting Up the App
Organizing Folders
Next, we will specify the structure of our folders within our project folder and the purpose of each of the folders or files we have.
home.py: This is the main file of our Streamlit app.pages/: In this directory, we store individual pages of the Streamlit app.services/: This folder contains code that interfaces with external services or databases.models/: This directory holds the data models, particularly useful if you’re interacting with databases.credentials/: A designated folder for managing sensitive information securely.venv/:Our virtual environment for managing project dependencies.(Optional) .gitignore: To specify untracked files that Git should ignore.(Optional) README.md: For documentation about the project.
By organizing our folders in this manner, we ensure that all our files are systematically arranged for easy access and efficient workflow management.
Pages: The Streamlit App
In the ‘pages/’ folder of our Streamlit application, we will store all the .py files that represent each page of our multi-page application. This structure allows us to organize our application into separate pages, each with its own Python script. For more detailed information on creating multi-page applications in Streamlit, you can refer to their official documentation here: Streamlit Multi-Page Apps.
Here’s an example of how the folder structure for a multi-page Streamlit app might look:
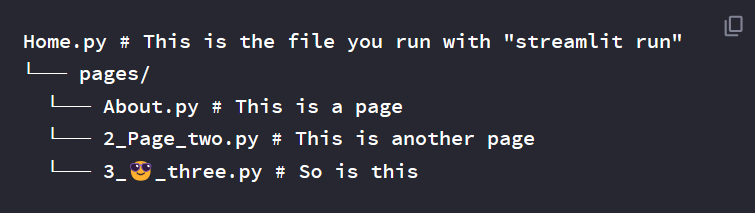
The ‘Home.py’ file serves as the entry point, orchestrating the different pages within the ‘pages/’ folder. Each .py file inside this folder represents a unique page in the application. The naming convention of these files is straightforward and intuitive, where the file name directly corresponds to the page it represents.
Services: Implementing the Snowflake Connector
In our Streamlit application, an essential aspect of interacting with Snowflake, the cloud data platform, is through a dedicated service. For this purpose, we’ll create a file named SnowflakeConnector.py. This file will be responsible for establishing and managing the connection with Snowflake, ensuring secure and efficient access to our data.
Here’s a brief overview of what SnowflakeConnector.py would contain:
- Snowflake Connection Setup: The file starts by importing the necessary modules –
snowflake.connectorfor the Snowflake connection andosfor accessing environment variables. - Credentials Import: We import credentials from a separate
credentialsfile. This approach keeps sensitive information secure and separate from the main codebase. - Connect Function: The
connect_snowflakefunction is the key component. It uses environment variables to securely connect to Snowflake without hardcoding sensitive details like user credentials. After establishing the connection, it confirms the successful connection and returns the connection object.
def connect_snowflake():
    conn = snowflake.connector.connect(
        user=os.getenv('SNOWSQL_USR'),
        password=os.getenv('SNOWSQL_PWD'),
        account=os.getenv('SNOWSQL_ACC'),
        warehouse=os.getenv('SNOWSQL_WH'),
        database=os.getenv('SNOWSQL_DB'),
        schema=os.getenv('SNOWSQL_SCH')
    )

    print("Snowflake connection successfully.")

    return conn
In addition to SnowflakeConnector.py, we’ll have a controller.py file in the same services/ folder. This file will act as a controller for various data operations, including:
- Data Retrieval Methods: Functions like
get_all_from_model_1that retrieve data from Snowflake. - Data Insertion Methods: Functions to insert data into Snowflake tables.
- Other Data Manipulation Methods: Additional methods for updating, deleting, or any other data manipulation requirements.
The controller.py will use the connect_snowflake method from SnowflakeConnector.py to establish a connection with Snowflake and perform these operations. This structure ensures a clear separation of concerns – with SnowflakeConnector.py handling the connection logistics and controller.py focusing on specific data operations. This setup contributes to a clean, maintainable, and scalable application structure.
Models
In our Streamlit application, the ‘models/’ folder plays a crucial role, especially when our application interacts with databases or needs to structure data in a specific format. The concept of “models” in this context refers to Python classes that represent the data structure of objects we will use throughout the application. These models act as blueprints for how data is organized and manipulated.
Handling Credentials
It’s crucial to handle credentials securely. For this purpose, create two files: CredentialsMock.py and Credentials.py. CredentialsMock.py serves as a template and can be safely added to your GitHub repository. It should contain structure but no sensitive data. On the other hand, Credentials.py will store your actual credentials and should never be added to version control. This approach ensures that sensitive information is kept secure.
import os
os.environ["SNOWSQL_PWD"] = ""
os.environ["SNOWSQL_USR"] = ""
os.environ["SNOWSQL_ACC"] = ""
os.environ["SNOWSQL_WH"] = ""
os.environ["SNOWSQL_DB"] = ""
os.environ["SNOWSQL_SCH"] = ""
os.environ["API_KEY"] = ""
Finally: Run Streamlit
After following all the steps discussed in this blog, the next action is to run the application. The process is simple:
- Activate the Virtual Environment: Ensure that the virtual environment for the project is active. This step is crucial for accessing all the necessary dependencies.
- Set Snowflake Variables: Input the necessary environment variables for your Snowflake account. This setup is vital for the application to interact correctly with Snowflake.
- Run the Application: Execute the command
streamlit run home.pyin your terminal. This will start the Streamlit application and enable you to interact with it.
With these steps, your Streamlit application should be up and running, showcasing the functionality you’ve integrated throughout this guide.