Fivetran and Airbyte are two tools that extract, load and possibly transform (the ELT process) data. The data can come from many different places, for example, a Snowflake account. This blog is part of a series about the setup of both tools. For a more in-depth explanation and a comparison of the tools, look at this blog of my colleague Sebastian. In this blog we will dive into the setup in Snowflake to make a connection to Fivetran.
Fivetran
In Fivetran the source of the data pipeline is called a connector, and the target of the pipeline is named a destination. To show how to setup both sides in Fivetran I will make a connection between two schemas that live in a database specified for Fivetran of my Snowflake instance.
The setup guide of Fivetran includes a script that you can copy and paste into Snowflake to create all the necessary data objects and privileges. However, at Nimbus Intelligence we do not like to blindly run a script. Certainly not if it includes setting up security and granting privileges. A good practice is to always give roles the minimum amount of privileges that they need, so we are going to set it up ourselves.
Snowflake Setup
Start the Snowflake setup with the creation of a database called fivetran. Besides the default schemas, I have created one other schema. In the source schema, there will be a table that Fivetran will extract. Fivetran makes its own target schema based on a prefix and the name of the source schema.
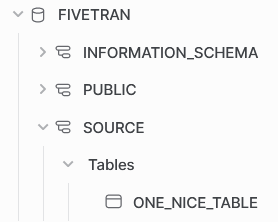
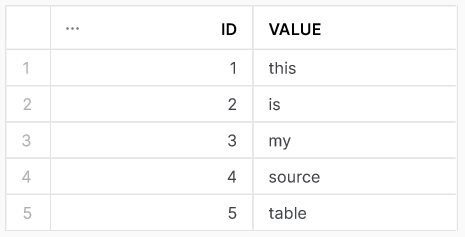
one_nice_table in source schemaAs is best practice, we make designated objects for Fivetran that can access the appropriate information. Normally, the schemas would be on two different account so I am going to treat the creation of these objects as such. Which objects do we need to make?
- Create two warehouses (e.g.
fivetran_source_whandfivetran_target_wh). The settings for these warehouses are up to you, and the project. Check out this blog if you want to learn more about the possibilities to scale up or out with your Snowflake warehouses; - Create two roles (e.g.
fivetran_source_roleandfivetran_target_role). We will grant the correct permissions for these roles later; - Create two users (e.g.
fivetran_source_userandfivetran_target_user). Grant the roles to their respective users. I recommend settingdefault_roleanddefault_warehousefor both users such that Fivetran instantaneously connects to Snowflake with the correct details. - [OPTIONAL, but recommended] Create a resource monitor that keeps tabs on the warehouse. Definitely do this if you are unsure how to setup Fivetran or have doubts about the data complexity.
fivetran destination setup
When you setup the data pipeline in Fivetran for Snowflake, you will have to start by creating a destination. Fivetran has an easy setup guide which is shown besides the setup screen. Even without this guide, the setup is fairly easy. Firstly, fill in your Snowflake account identifier at the ‘Host’ parameter. Be sure to include your region and cloud provider if necessary (AWS does not have to be specified for some regions), and follow it with .snowflakecomputing.com. Secondly, choose a port you want the connection to go through. For Snowflake the default is 443, and in the Snowflake documentation it is suggested not to change this port.
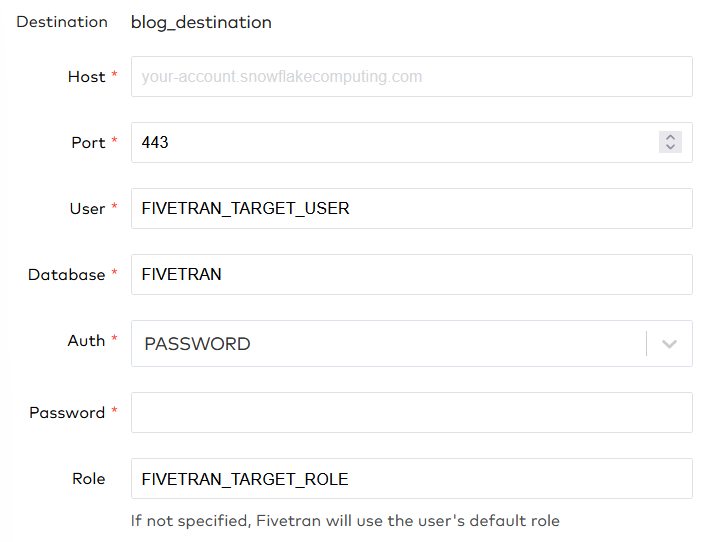
Thirdly, fill in the user, database and role that we created for the Fivetran target. Note here that Fivetran has a caption underneath the role: ‘If not specified, Fivetran will use the user’s default role’. Since we set the correct default role for this user, we could technically omit this value. Also note that all parameters are in uppercase. Does this really matter? YES! While trying Fivetran out we found out that it does a case-sensitive comparison for the role. Lastly, fill in the password or use a key-value pair. There are some more settings that you can leave at default or set up as needed for your specific use case.
PRIVILEGES FOR DESTINATION
Remember that we still have to set the correct privileges for the fivetran_target_role before we test the destination. We can start with an obvious grant. The roles need access to the fivetran database. Using the concept that roles need minimum access, we grant the usage privilege. Fivetran creates its own target schema, so it needs to be able to create a schema in the database. Just remember that the ownership will then go to the fivetran_target_role. Furthermore, the role needs a ‘brain’ to create new tables so assign it usage privilege to the fivetran_target_wh. I think these are now sufficient privileges to make the connection. Let’s try it out!
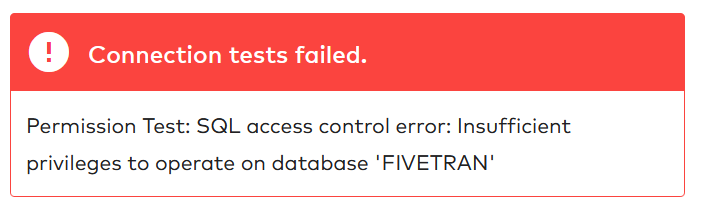
Ah, the connection tests failed. Fivetran needs more privileges to operate on my Snowflake database fivetran. I would really not like to give Fivetran the ability to modify the database, but the monitor privilege should be fine because this only allows Fivetran to use the DESCRIBE command.
FIVETRAN connector setup
Now we can setup a connector to tell Fivetran where the Snowflake source is. As a destination we choose the destination just made, in my case blog_destination. The setup of the source is very similar to the setup of the destination, including a helpful setup guide on the right side of the screen. As we did with the destination, we fill in the user, database and role created for the source.
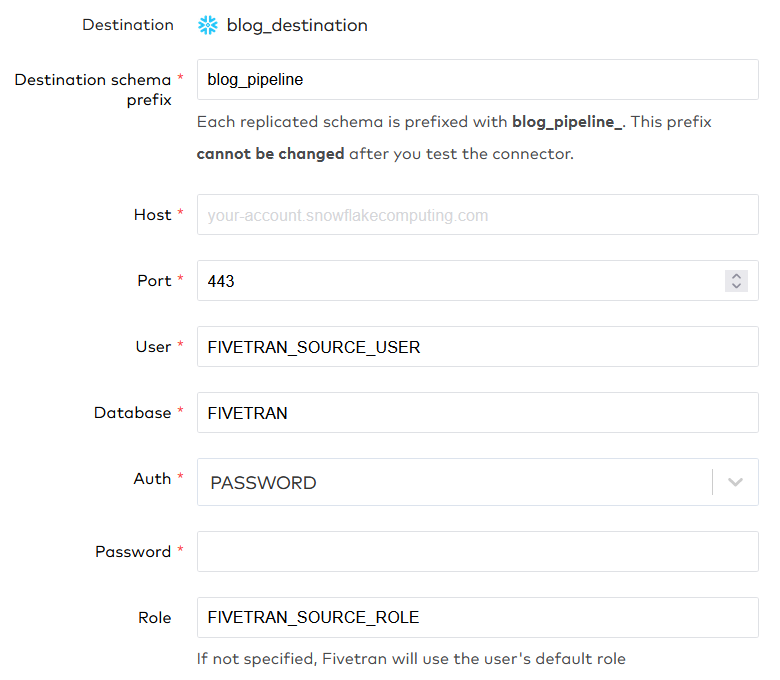
Note that we specify a destination schema prefix, and that this cannot be changed after you test the connector. Chose the prefix wisely. We have specified all the names in capitals again because this connections also has some case-sensitive tests. Beneath these setup parameters, Fivetran specifies IP addresses that Fivetran will use to make the connection. If you have a network policy in place, make sure that you add all the addresses to the allowed_ip_list.
PRIVILEGES FOR CONNECTOR
We still have to grant the correct privileges to the fivetran_source_role. As with the target role, we need to grant usage on a warehouse and on the correct database. Since this is the source role, I assume that the role needs reading but not writing privileges. We also grant usage on the source schema, and select on the table that we want to pull through the data pipeline.

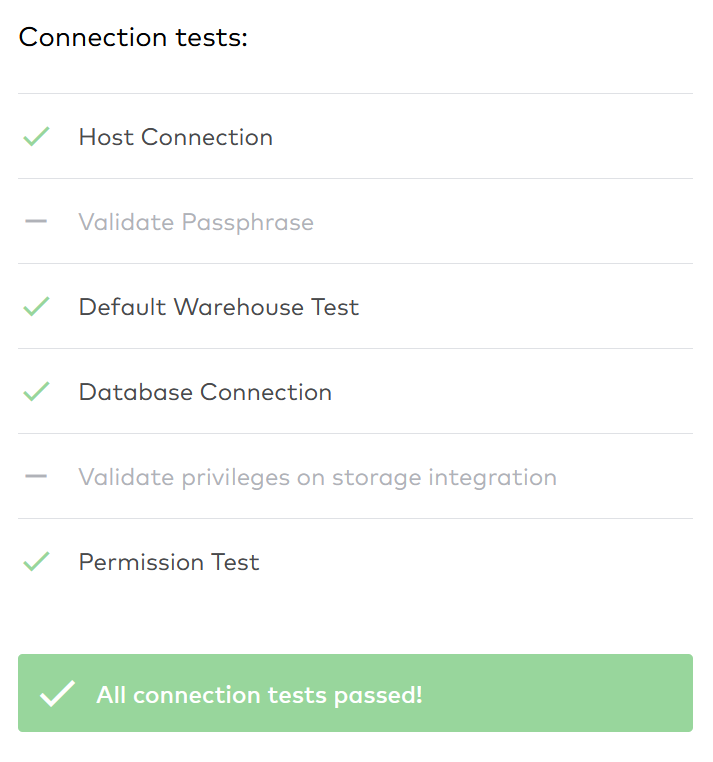
For the connector we passed all tests on the first try. We gave the fivetran_source_role minimum privileges and the connection is still valid. Now we can actually try to get my one_nice_table in the target schema.
syncing data
After initial syncing (this can take quite a while, depending on your data volume), we can see the source data and the correct table. We select the table to sync. At this point you could also deselect some columns if you do not want to sync these to the destination. I am going to select everything in the source that I have access to.

In the next step, Fivetran asks how you would like to handle changes. Fivetran gives the following options.
- Allow all
Fivetran allows all new schemas, tables and columns; - Allow columns
Fivetran will block new schemas and configurable tables, but allow new columns; - Block all
Fivetran will block all new schemas, configurable tables and columns.
At Nimbus Intelligence we usually opt for the ‘Block all’ option. This adheres to our minimum access policy. If we allow Fivetran to handle extra tables or columns, we do not control how the target table looks like. Yes, we might want to add these extra columns. However, we would like this to be a conscious choice.
Be cautious
Imagine that we have automated the whole data pipeline from this table that Fivetran populates all the way to an end table that is used by Tableau developers. If Fivetran is allowed to push new columns into my database, I had no opportunity to validate and test this data. The Tableau developers might think, “Oh cool, we have some new data to work with. Kris just forgot to let us know.”. This could lead to unwanted situations. Another important factor is that allowing changes has the potential to massively increase the cost of Fivetran. If there is an unexpected new table with 150 million rows in your schema, Fivetran charges you per row to sync this data to the destination, even if you do not even need that table. Therefore, we like to block all changes and just change the connection manually.
Conclusion
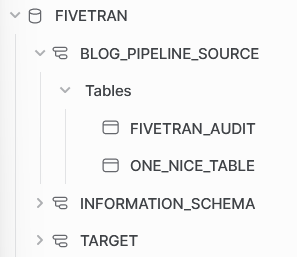
After the initial sync, our database environment in Snowflake has a new schema blog_pipeline_source. Unfortunately, we could not let Fivetran put the schema in our initial intended target schema. We can work with this outcome nonetheless. Note that Fivetran builds an additional table fivetran_audit. This holds information about the sync, and could be useful for debugging or gaining insight into the Fivetran syncs. Also note that the original table has three more columns, inserted by Fivetran. These have an unique fivetran id, a column to indicate if there was a deletion and the time it was synced. All these can be used to validate which updates were done and to clean your table in the staging process.

one_nice_table in target schemaThe setup of a connection between Fivetran and Snowflake is a straight-forward process. Remember to capitalize the identifiers and assign a default role and warehouse to the Fivetran user. The permission that Fivetran needs in Snowflake are acceptable for the owners of the Snowflake instances, and can be seen in the code below.
GRANT USAGE ON WAREHOUSE fivetran_target_wh TO ROLE fivetran_target_role;
GRANT USAGE, MONITOR, CREATE SCHEMA ON DATABASE fivetran TO ROLE fivetran_target_role;

GRANT USAGE ON WAREHOUSE fivetran_source_wh TO ROLE fivetran_source_role;
GRANT USAGE ON DATABASE fivetran TO ROLE fivetran_source_role;
GRANT USAGE ON SCHEMA fivetran.source TO ROLE fivetran_source_role;
GRANT SELECT ON TABLE fivetran.source.one_nice_table TO ROLE fivetran_source_role;
Curious how to do the same in Airbyte? Read the next blog in the series here!