Snowflake, as a modern cloud database, has the functionality to mask sensitive data for unauthorized users through Data Governance Features. In this blog, we are thus going to present Dynamic Data Masking policies at column level. This feature allows to protect sensible data, by controlling the column data and making it visible only to an authorized person or group of people (basing on their role).
N.B: This feature is available to all accounts with an edition that is Enterprise (or higher).
What is Snowflake MASKING POLICY?
Masking policies are one of the two Dynamic Data Masking features that allows to apply column level security to a table. As the name suggests, it is an object that simply replaces sensible data that should not be visible to a user with a masking substituting-text.
Once created, this object belongs to a schema and it can be applied to all tables and views that belong to it. It doesn’t work on materialized view.
Being a dynamic feature, these policies are logical and, hence, are recompiled and applied at query time. This choice is taken to preserve data from persistent alteration/masking of the original table in the database.
Based on the masking policy conditions and the role that a user possesses, a masking policy can return the whole plain-text value, a partially masked value, or a fully masked value.
How to use masking policies?
Here an example of how it works.
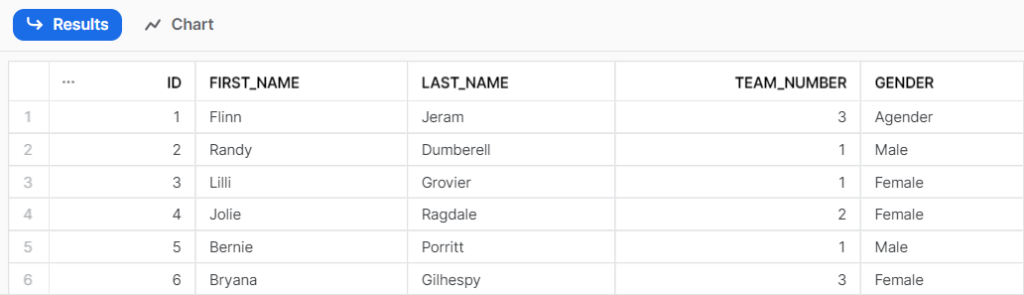
Let’s imagine to build a table containing basic information about the employees of the management department of a firm. We would call it MNG_Employees and it would look like this:
Now, a legit request from our client could be to prevent any user that doesn’t belong to HR or to general administration to see sensible information in order to respect privacy standards. In this case, the gender of an employee.
To do so, we will need create a role for all the HR people who can manage sensible information. The other users, the ones from general administration, will also receive the privilege to work under this role.
We remind the reader that this role will need basic usage and access to this table in order to see it in the first place.
//ROLES TO CHECK ON EMPLOYEES:

CREATE ROLE HR_Manager;
GRANT USAGE ON WAREHOUSE My_WH TO ROLE HR_Manager;
GRANT USAGE ON DATABASE My_DB TO ROLE HR_Manager;
GRANT USAGE ON SCHEMA My_DB.My_Schema TO ROLE HR_Manager;
GRANT SELECT ON ALL TABLES IN SCHEMA My_DB.My_Schema TO ROLE HR_Manager;
At this point, we can create the masking policy. We will specify that only the HR_Manager role and the ACCOUNTADMIN (to guarantee us supervision on the correct functioning) will have full access to the gender column. All the other roles will read CONFIDENTIAL.
//MASKING POLICY ON GENDER COLUMN:

CREATE OR REPLACE MASKING POLICY My_DB.My_Schema.Mask_Gender AS
  (Gender VARCHAR) RETURNS VARCHAR ->
  CASE
    WHEN CURRENT_ROLE() IN ('ACCOUNTADMIN', 'HR_MANAGER') THEN Gender
    ELSE '*CONFIDENTIAL*'
  END;
Done! The policy is now created.
As said, this object now belongs to the schema of pertinence, but it is still not active on the column of interest in table of the employees.
To do so, we simply procede with this query:
//APPLY THE POLICY TO THE TABLE:

ALTER TABLE MNG_Employees MODIFY
  COLUMN Gender SET MASKING POLICY My_DB.My_Schema.Mask_Gender;
It works! Using a role that is not in our selected list, what we would obtain by querying the table is:

Snowflake will also allow to customize masking policies in various ways. One of the most recurrent is the use of mapping tables and security based on user-access instead of roles. This becomes useful in the case of big companies and log ins through active directories.
It is also possible to schedule, through tasks and stored procedures, the automatic application of masking policies everytime a user generates or recreates a new table.
Conclusion
We have talked about Dynamic Data Masking and the function MASKING POLICY, explaining what they are and how to set them in place.
We hope you have found this useful!
Have questions about data? Be sure to check our blog.