
GitHub Actions have revolutionized the way developers automate and streamline their workflow processes. This powerful tool, seamlessly integrated into the GitHub platform, offers unparalleled flexibility and efficiency in managing software development tasks. In this blog, we’ll dive into how you can set up, understand, and optimize GitHub Actions, along with essential security practices to ensure your workflows are both efficient and secure.
What is a GitHub Action?
Before diving into the setup process, it’s important to understand what a GitHub Action is. Simply put, GitHub Actions are automated tasks that you can set up in your GitHub repositories. These actions can be triggered by various GitHub events, such as a push to a branch, a pull request, or even a specific comment on an issue. They are incredibly useful for automating workflows, from simple tasks like linting code to more complex ones like deploying applications.
Understanding GitHub Actions
The Core Concepts
GitHub Actions are more than just automation scripts; they represent a powerful, integrated CI/CD solution that operates directly within your GitHub repository. Understanding the core concepts of GitHub Actions will help you utilize them more effectively.
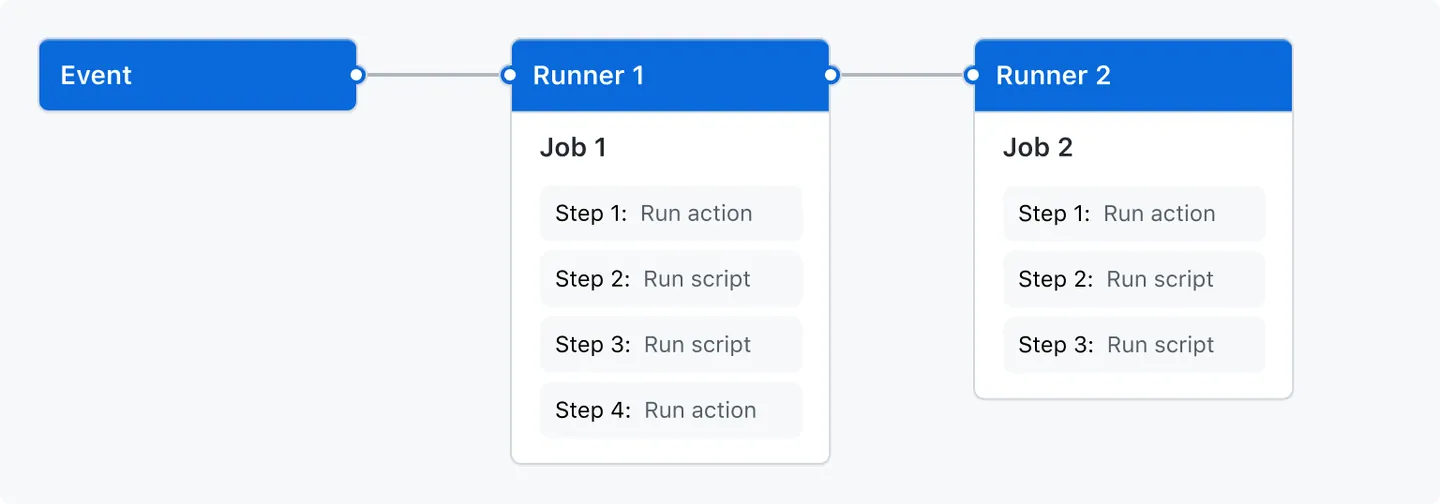
- Events: Events are specific activities in your GitHub repository that trigger an action. These can range from git operations like
pushandpull request, to issue commenting and even scheduled events. - Workflows: A workflow is a configurable automated process made up of one or more jobs. Workflows are defined by a YAML file in your repository’s
.github/workflowsdirectory. - Jobs: A job is a set of steps that execute on the same runner. By default, jobs run in parallel, but they can be configured to run sequentially.
- Steps: Steps are individual tasks that run commands in a job. A step can either run a script or an action.
- Actions: Actions are standalone commands that combine into steps to create a job. Actions can be written in any language and can be reused across multiple workflows.
- Runners: Runners are the servers that execute your workflows. GitHub provides hosted runners with different operating systems, or you can host your own runner for more control and customization.
Benefits of Using GitHub Actions
- Automation and Efficiency: Automate every aspect of your software development workflow, from code linting to deployment, reducing manual errors and increasing efficiency.
- Integrated CI/CD: Seamlessly integrate continuous integration and deployment into your development process, directly within GitHub’s ecosystem.
- Customization and Flexibility: Tailor workflows to meet the unique needs of your project, with the ability to use and create custom actions.
- Community-Driven Marketplace: Access a vast marketplace of actions created by the GitHub community, which can speed up your workflow setup.
- Platform Agnostic: Run workflows on Linux, Windows, and macOS runners, providing flexibility across different environments.
Step-by-Step Guide to Your First Action
- Choose a Repository: Start by selecting a GitHub repository where you want to implement the action. It can be an existing repository or a new one created for this purpose.
- Creating a Workflow File: In your repository, navigate to the
.github/workflowsdirectory. If this directory doesn’t exist, create it. Inside this directory, create a new file for your workflow, such asmain.yml. - Defining the Workflow: Inside the
main.ymlfile, you’ll define your workflow. A basic workflow file starts with thenameof the workflow and theonkeyword, which specifies the event that triggers the action. For example, to trigger an action on every push to the main branch, your file will start with:name: CI Buildon:push:branches: [ main ]
- Adding Jobs and Steps: Under the
jobskey, you define the tasks (known as jobs) that the workflow will execute. Each job contains steps that use actions. These actions can be custom scripts or predefined actions available in the GitHub Marketplace. A simple job to print «Hello World» in the console would look like this:jobs:build:runs-on: ubuntu-lateststeps:- name: Print Hello Worldrun: echo "Hello World"
- Commit and Push: After defining the workflow, commit the file to your repository and push it to GitHub. This will trigger the action based on the defined event.
- Monitor Your Action: Once the action is triggered, you can monitor its progress and view logs directly on GitHub under the «Actions» tab in your repository.
Conclusion
As we’ve explored in this blog, GitHub Actions stand out as a remarkably flexible and powerful tool for automating a wide range of software development processes. From setting up your first action to delving into advanced techniques and ensuring robust security practices, GitHub Actions open up a world of possibilities for streamlining and enhancing your workflows.
Understanding GitHub Actions is crucial for modern software development, offering a seamless integration of CI/CD processes directly within the GitHub ecosystem. Whether you’re a beginner just starting out or an experienced developer looking to optimize your projects, the knowledge and strategies discussed here provide a solid foundation for leveraging GitHub Actions to their fullest potential.
Embrace the power of GitHub Actions to transform your development process, ensuring greater efficiency, security, and productivity in your projects.