When working with Snowflake and Coalesce.io to build a modern data pipeline, one of the most essential tasks is reading files from Snowflake’s internal stages. These stages serve as the entry point for uploading data into Snowflake before processing and transforming it further. In this article, I’ll walk through how to effectively read files from a Snowflake internal stage in Coalesce.io, including the necessary commands and steps to get your pipeline up and running smoothly.
Coalesce
Coalesce.io is rapidly gaining traction in the data engineering world for its user-friendly interface and ability to transform data across a variety of platforms, including Snowflake. Snowflake, in turn, provides robust staging capabilities that allow users to load and store data temporarily. Leveraging both platforms together creates a seamless and efficient pipeline.
To integrate data from a Snowflake internal stage into Coalesce.io, you’ll need Coalesce.io’s CopyInto node, derived from Snowflake’s COPY INTO command.
Let’s break down how this process works, starting with the basics.
Understanding Snowflake’s COPY INTO command
The COPY INTO command is used in Snowflake to load data from a stage into a table. The internal stages in Snowflake act as temporary storage for data files before they are loaded into a Snowflake table. To read files from an internal stage, we use the COPY INTO command, which specifies the source stage and the target table.
Here’s a basic example of the COPY INTO command:
This command loads data from my_internal_stage into my_table using the specified file format. The command is highly customizable and allows filtering of data based on file names, file types, and more. Read more about the COPY INTO command in the Snowflake Documentation.
Coalesce’s External Data Package
In Coalesce.io, the External Data Package offers tools for loading and handling external data in Snowflake, including automatic schema detection, data import and export, API connectivity, and support for parsing Excel files.
More specifically, it includes:
For this use case, we’ll focus on the CopyInto node. Read here how to Install and Manage Coalesce’s packages.
Coalesce’s CopyInto node.
Let’s get to the practice. Consider the Internal Stage SUPERSTORE, containing the file orders.json:
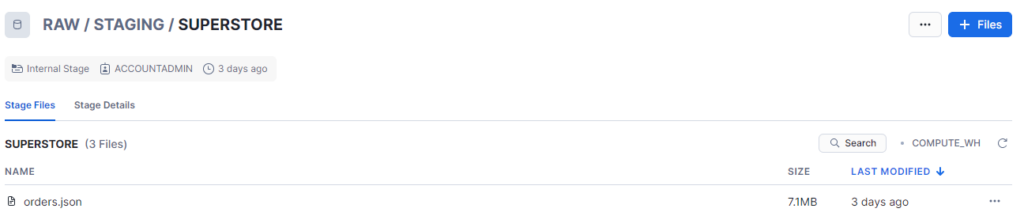
- First, I need to make sure that the Snowflake Role I use in Coalesce (which I’ll call COALESCE_ROLE) has all the grants to read from this stage.
GRANT READ ON STAGE RAW.STAGING.SUPERSTORE TO ROLE COALESCE_ROLE;
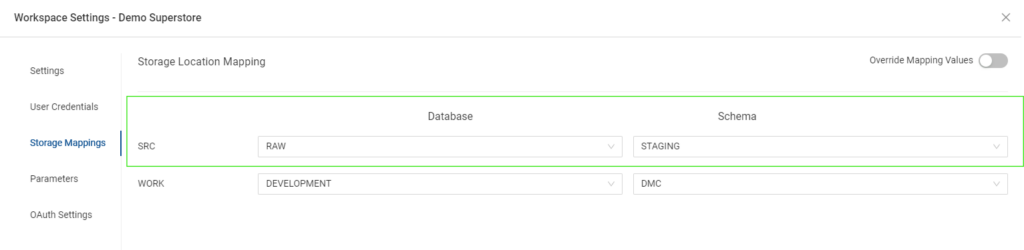
- Secondly, I need to make sure I created a Storage Location in Coalesce, which I’ll name SRC (Source), that points to the database (RAW) and schema (STAGING) where the SUPERSTORE internal stage resides:
- The third step is to create a CopyInto node, which I renamed into “READ_FROM_JSON_ORDERS” for convenience:

- After you create the node (you’ll see it in the Browser Graph under the Build tab), it’s time to configure it. Double-click on the node, and set the following:
- Under Node Properties, make sure the Storage Location is where you want your nodes to be materialized (in my case I selected SRC).
- Under General Options, you can choose how to materialize your node. I selected table for my project.
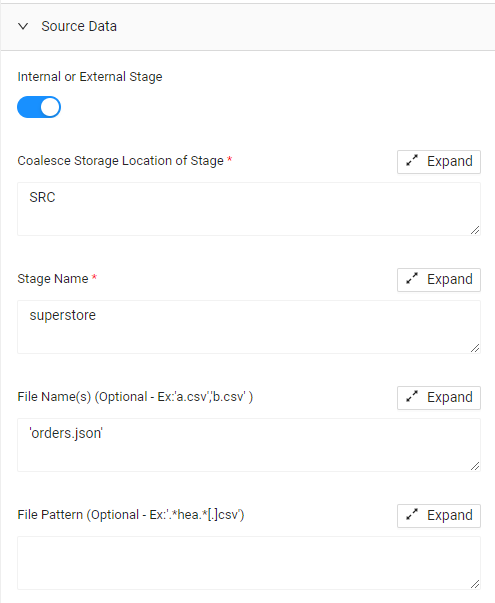
- Under Source data, toggle on “Internal or External Stage”, fill in the fields with the correct Storage Location (SRC), the Stage Name (superstore), and the File name surrounded by single quotation marks (‘orders.json’).
- Under File Format, select File Format Values then JSON (or any other file format, according to the format of the file in your Internal Stage.
- Add any other customized behavior setting under File Format and Copy Into Options. Consult the Snowflake Documentation for more details on the behavior settings.
- Now that your node exists, you can perform the usual Validate Create, Create, Validate Run, and Run.
- Check in Snowflake that your tables were created. Coalesce automatically creates a Variant column to store the JSON data, ready to be flattened.
What’s next
Now it’s time to start transforming data. To do so, create a Staging node (STG_NODE), from which you can automatically parse the data in JSON structure in the Variant column of the READ_FROM_JSON_ORDERS you just created:

By opening the STG_ORDERS node and right-clicking on the Variant column, you can select the option Derive Mappings. This will automatically flatten the data in JSON format into columns and rows.
From this moment onwards, you can continue building your data pipeline creating Facts, Dimensions, Views, and more.
Banner Photo by Maksym Kaharlytskyi on Unsplash