Navigating through the realm of data management in Snowflake unveils a key feature known as Snowflake Internal Stages. These stages act as temporary storage areas, enabling a seamless data loading and unloading process. This blog aims to demystify the intricacies of Internal Stages and provide insightful guidance on leveraging them effectively.
1. Introduction to Snowflake Internal Stages
Snowflake Internal Stages serve as temporary holding areas for data during certain operations, like loading data into a table or unloading it from a table. These stages are integral to Snowflake’s architecture, ensuring that data management processes are streamlined and efficient

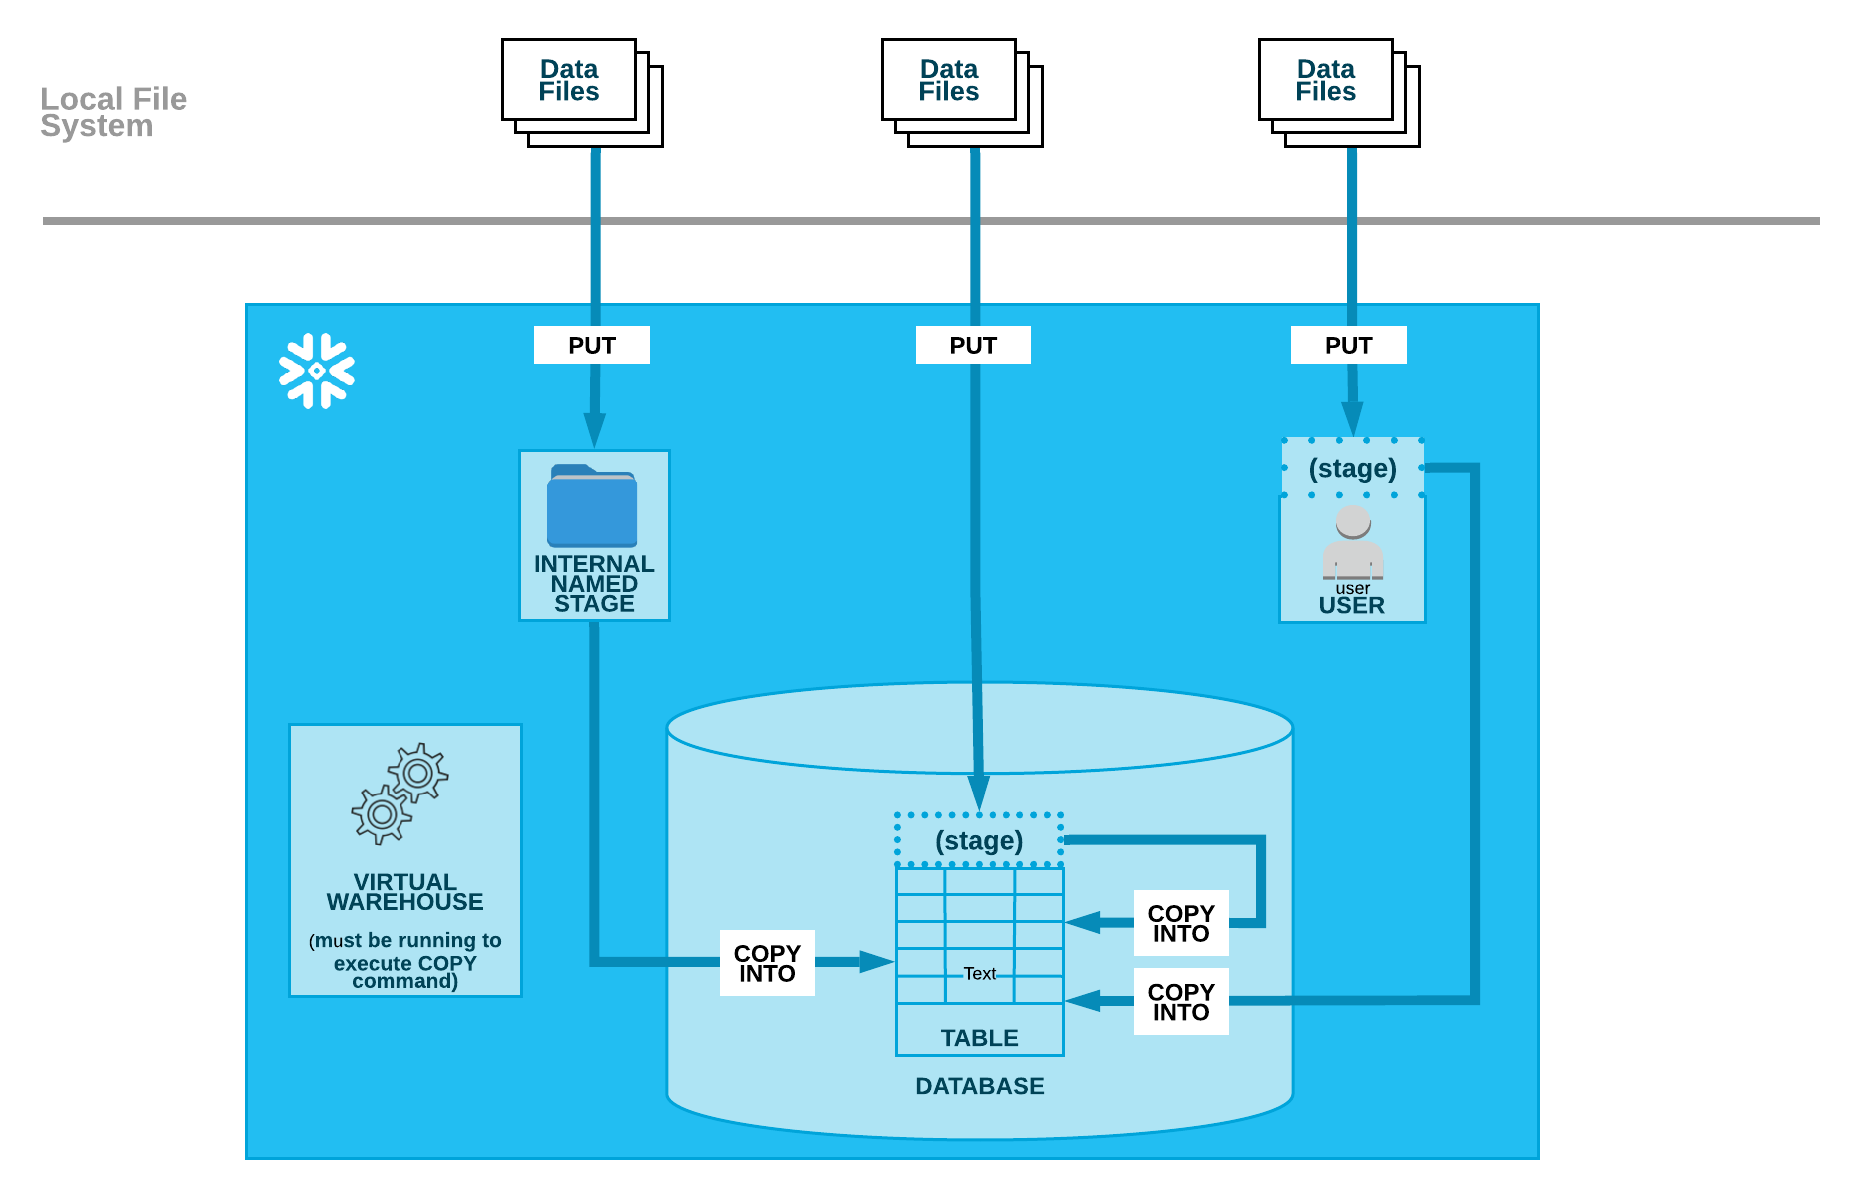
Loading Data Schema

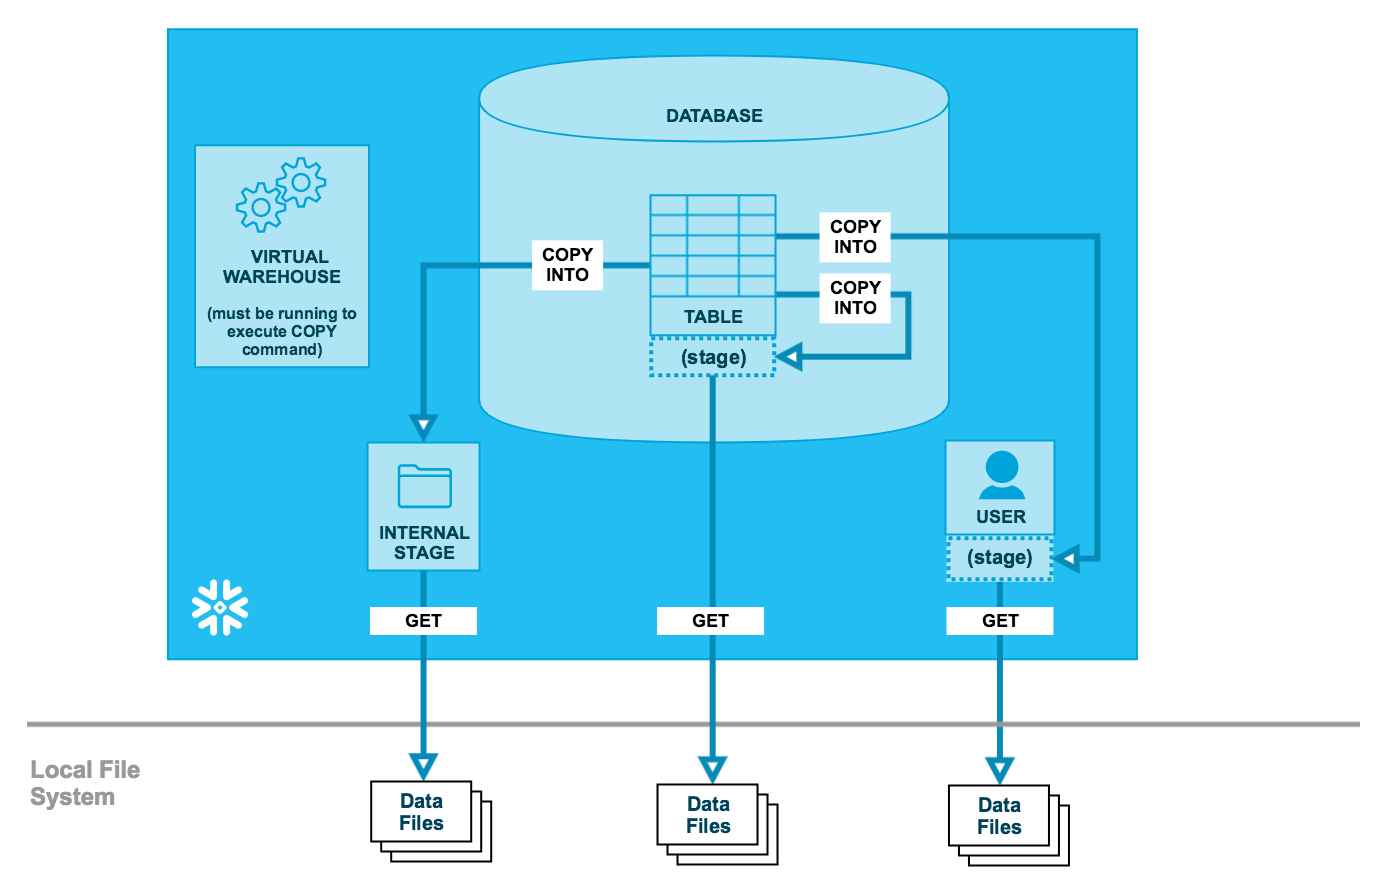
Unloading Data Schema
2. Types of Internal Stages
In Snowflake, internal stages are categorized into three types based on their allocation and usage scenarios. Each type comes with its set of characteristics that dictate how data can be staged, accessed, and managed within these temporary storage areas. Below is a detailed table that outlines the distinctions among User Stages, Table Stages, and Named Stages:
| Type | Allocation | Usage Scenario | Characteristics |
| User Stage | Automatically allocated to each user | Suitable for files accessed by a single user but copied into multiple tables | – Referenced using @~. – Can’t be altered or dropped. – Do not support setting file format options |
| Table Stage | Automatically allocated to each table | Suitable for files accessible to multiple users and copied into a single table | – Referenced using @%TableName– Can’t be altered or dropped – Do not support setting file format options – Do not support transforming data while loading |
| Named Stage | Created as needed with greater flexibility. Is a Database/Schema object. | Suitable for regular data loads involving multiple users and/or tables | – Referenced using @StageName– Can load data into any table – Security/access rules apply – Privileges can be granted or revoked |
3. Creating a Named Internal Stage
Creating a Named Internal Stage in Snowflake can be accomplished either through SQL or the web interface, providing a flexible approach to meet different user preferences. This process is essential for those looking to have a more controlled and customizable staging area for their data. Here’s a step-by-step guide on how to create a Named Internal Stage in Snowflake, as outlined in the Snowflake Documentation:
- Choose a Role with privileges: Certain privileges are necessary to create or manage internal stages. For instance, a role needs the USAGE privilege on the database and schema that store the stage. Additionally, the CREATE STAGE privilege on the schema is essential for creating a named internal stage.
- Create Through SQL => Check Snowflake Documentation
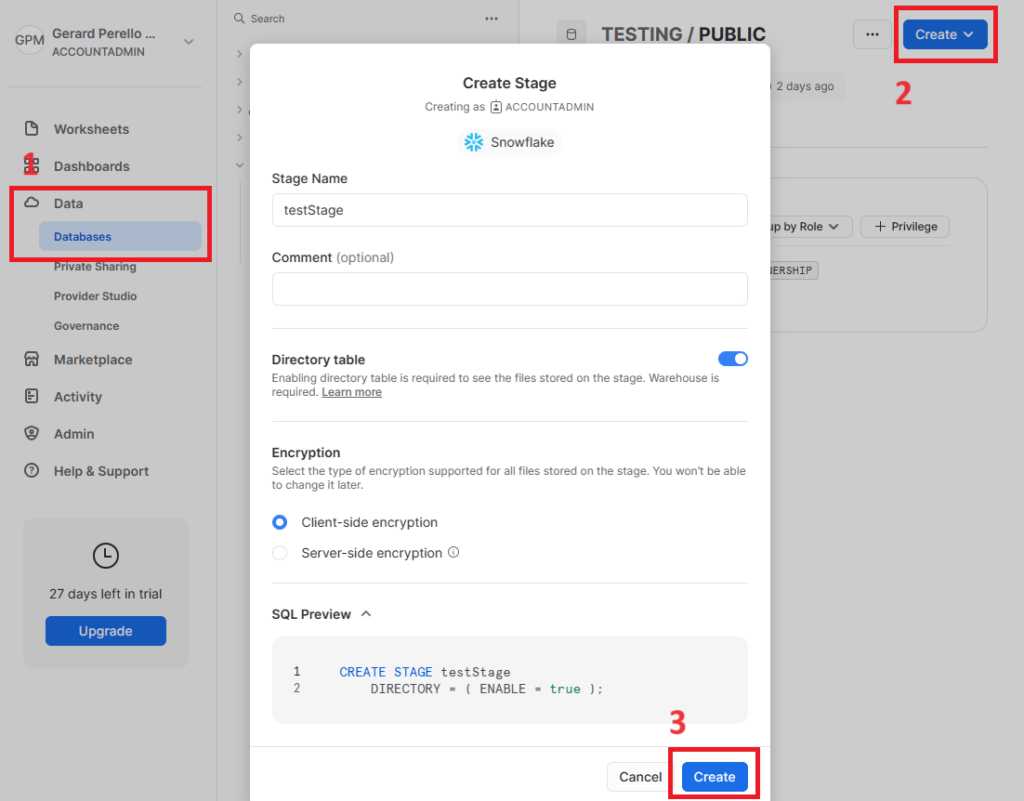
- Create Through Web Interface:
- First, select a database. Then, click to create Button and select “Stage”. Finally, complete the form and click “Create”.

4. Loading Data into Internal Stages
Loading data into Snowflake involves a two-step process where data files are first uploaded to an internal stage using the PUT command (using SnowSQL or Python Extensions), and then loaded into the desired table using the COPY INTO command. This structured approach ensures that data is accurately staged and loaded into Snowflake tables for further processing.
- Uploading Files using the PUT Command:
- PUT file://<path_to_file>/<filename> internalStage => See Snowflake Documentation
- Loading Data using the COPY INTO Command:
- COPYINTO [<namespace>.]<table_name> FROM { internalStage } PARAMS => See Snowflake Documentation
5. Organizing Data in Internal Stages
Organizing data efficiently in internal stages is essential for smooth data management operations. A well-structured partitioning of data into logical paths can be highly beneficial. Here are some recommendations along with examples for better clarity:
- Partition Data:
- Divide your data into logical paths based on certain criteria like geographical location, date, or other relevant identifiers.
- Example: If you have sales data from different regions, you might create partitions such as
/sales_data/AM/2023/,/sales_data/EU/2022/, etc., whereAMandEUrepresent North America and Europe respectively
- Use Descriptive Naming:
- Employ a naming convention that clearly indicates the content and purpose of the data within each path.
- Example: For a dataset containing user profiles, a path like
/user_profiles/active/could be used to store data of active users.
- Maintain Consistency:
- Stick to a consistent structure and naming convention across all your internal stages to ensure ease of navigation and data management.
- Example: If you have adopted a date-based partitioning scheme, ensure it is consistently applied across all datasets, like
/dataset_name/YYYY/MM/.
With a well-organized structure, navigating through the data in internal stages becomes straightforward, aiding in efficient data retrieval and management in Snowflake.
6. Use cases and Best Practices
Effectively leveraging internal stages in Snowflake revolves around understanding their appropriate use cases and adhering to best practices. Here are some insights:
- Internal vs. External Stages: The choice between internal or external stages depends on data storage preferences and workflow requirements. Internal stages suit local data storage within Snowflake, while external stages cater to accessing data from external cloud storage systems like Amazon S3, Google Cloud Storage, or Microsoft Azure
- Common Practices: Best practices enhance data management efficiency when using internal stages. For instance, it’s advisable to use a “Named” or “User” stage when planning to load data into multiple tables from a single stage. Consistent naming conventions and partitioning schemes also contribute to organized and navigable data staging environments
- Snowpipe for Continuous Data Loading: Snowpipe is a valuable feature for automated, near-real-time data loading from internal stages into Snowflake tables. Setting up Snowpipe to monitor and load data from internal stages can significantly streamline data loading workflows. Refer to this blog post for an in-depth exploration of Snowpipe and its interaction with internal stages
Understanding these use cases and best practices, along with leveraging Snowpipe for continuous data loading, can significantly optimize data management and workflow efficiency in Snowflake.
7. Conclusion
In this blog, we navigated through the crucial aspects of Snowflake Internal Stages, uncovering their types, creation process, and data loading procedures. We delved into how organizing data in these stages and understanding the access control mechanisms contribute to secure and efficient data management. Furthermore, we explored the best practices, including the use of Snowpipe for continuous data loading, which significantly enhances data handling capabilities in Snowflake.
Understanding and utilizing internal stages effectively can significantly streamline your data management in Snowflake. The insights provided in this blog serve as a solid foundation for both newcomers and existing users aiming to optimize their data workflows. By leveraging Snowflake Internal Stages effectively, you’re stepping towards optimized data management and improved workflow efficiency in Snowflake.


