Fivetran and Airbyte are two tools that extract, load and possibly transform (the ELT process) data. The data can come from many different places, for example, a Snowflake account. This blog is part of a series about the setup of both tools. For a more in-depth explanation and a comparison of the tools, look at this blog of my colleague Sebastian. In this blog we will dive into the setup of Airbyte to make a Snowflake connection.
Airbyte
In Airbyte the user sets up the source and destination of the data pipeline independently from each other. Then the connection can be made between these. To show how to setup both sides in Airbyte I will make a connection between two schemas that live in a database specified for Airbyte of my Snowflake instance. Note that Airbyte itself warns you during setup that the Snowflake connector is a alpha release, and according to their documentation it is not ready for production use cases yet. Nevertheless, I would like to show you how to setup a Snowflake connection, and some of the issues Airbyte might still have to dissolve before general availability.
Snowflake setup
Start the Snowflake setup with the creation of a database called airbyte. Besides the default schemas, I have created two other schemas. In the source schema, there will be a table that Airbyte will extract and then load into the dest schema. Before we configure and run Airbyte, the dest schema is empty.
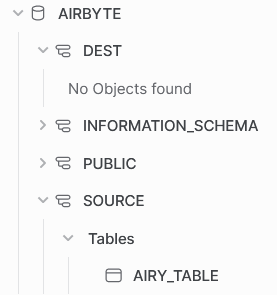
airy_table in the source schemaSimilarly to the Fivetran setup, we make designated objects for Airbyte that can access the appropriate information. Normally, the schemas would be on two different account so I am going to treat the creation of these objects as such. Which objects do we need to make?
- Create two warehouses (e.g.
airbyte_source_whandairbyte_target_wh - Create two roles (e.g.
airbyte_source_roleairbyte_target_role - Create two users (e.g.
airbyte_source_userairbyte_target_userdefault_roleanddefault_warehousefor both users such that Airbyte instantaneously connects to Snowflake with the correct details. - [OPTIONAL, but recommended] Create a resource monitor that keeps tabs on the warehouses. Definitely do this if you are unsure how to setup Airbyte or have doubts about the data complexity.
airbyte source setup
To setup a Snowflake source in Airbyte, we use the object that we just created. Fill in the airbyte_source_user, airbyte_source_role and airbyte_source_wh. Just as in Fivetran, make sure to specify all identifiers in uppercase because we have run into issues multiple times because some tests within Airbyte are case-sensitive. There is an optional field to fill in the schema. If you want the source to connect to data objects from multiple schemas, leave this field blank. In my demo, I do specify the schema because I only need the table from that one schema. Lastly, fill in your own password and account name.

Before actually testing the setup, we need to assign the appropriate privileges. We have tested a set of privileges for the Fivetran setup. We assigned the same privileges that are shown in the code below.
GRANT USAGE ON WAREHOUSE airbyte_source_wh TO ROLE airbyte_source_role;
GRANT USAGE ON DATABASE airbyte TO ROLE airbyte_source_role;
GRANT USAGE ON SCHEMA airbyte.source TO ROLE airbyte_source_role;
GRANT SELECT ON TABLE airbyte.source.airy_table TO ROLE airbyte_source_role;
The source was setup successfully!
airbyte destination setup
For the setup in Airbyte of the Snowflake destination, we again use the specific created user, role and warehouse as shown in the image below. Contrary to Fivetran, Airbyte asks you to specify the schema. This is also the reason that we created the dest schema.
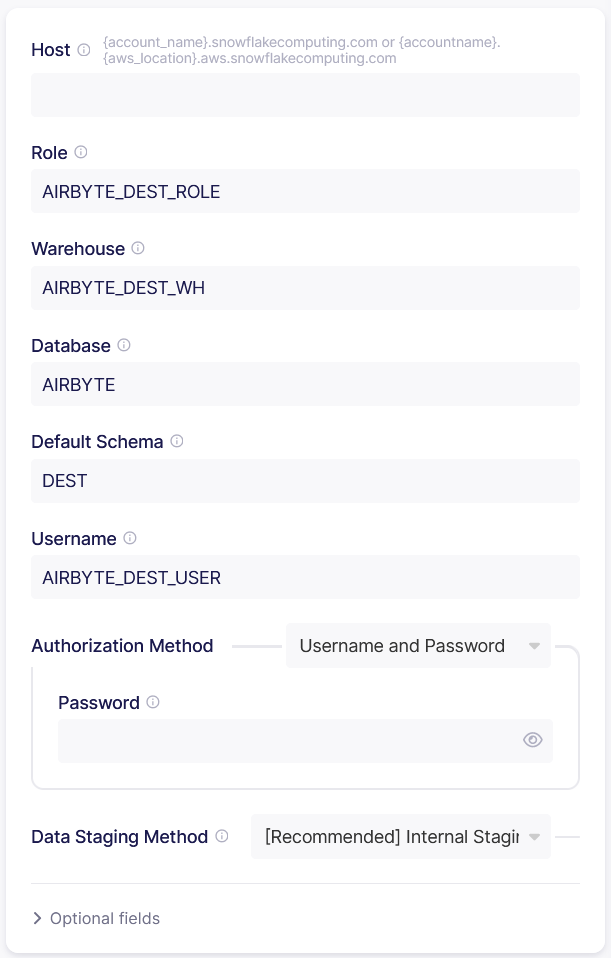
Airbyte asks you to setup a ‘Data Staging Method’. The options including the description that Airbyte gives in the information button:
- [Recommended] Internal Staging
Recommended for large production workloads for better speed and scalability. - AWS S3 Staging
Recommended for large production workloads for better speed and scalability. - Google Cloud Storage Staging
Recommended for large production workloads for better speed and scalability.
Ah, the description is the same for all options. Thus I have a hard time understanding which option to use. Luckily, there is a recommended option, so we can try that one for this demo.
Privileges for destination
With all the options filled in, we have to grant the correct privileges again. Since we know which schema the destination wants to connect with, we specify the usage and create table privilege for the dest schema. See the code below for all the grants that we think we will need.
GRANT USAGE ON WAREHOUSE airbyte_dest_wh TO ROLE airbyte_dest_role;
GRANT USAGE ON DATABASE airbyte TO ROLE airbyte_dest_role;
GRANT USAGE, CREATE TABLE ON SCHEMA airbyte.dest TO ROLE airbyte_dest_role;
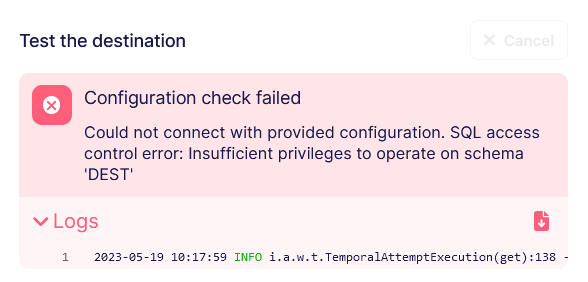
When we test the destination with these privileges we fail the check! Airbyte needs more privileges to operate on schema dest. If we consult the Snowflake documentation concerning schema privileges we see that we could also modify or monitor the schema. Furthermore, we can give the privilege to create a whole set of objects. At first we try to give the modify privilege. Fivetran also needed this privilege on the database and it does not allow the role a whole lot extra, only to use the DESCRIBE command. This is not enough for Airbyte. After trying a combination of other privileges I got a bit fed up and decided to grant ALL on the schema. In general, Nimbus Intelligence tries to avoid this because it is more difficult to keep a clear overview who can do what in the Snowflake instance. That should do it, right?
Luckily, yes!
AIrbyte connection
The Airbyte connection is easily setup. Chose the existing source and destination that we made in the previous steps. There are some more configuration that you can setup.
- Data residency
Choose where the data for this connection will be processed. Depending on your network configuration, you may need to add IP addresses to your allowlist. - Replication frequency
Set how often data should sync to the destination. When you are just trying Airbyte out, set this to ‘Manual’ to avoid lots of syncs of your data. - Destination Namespace / Destination Stream Prefix
If you want Airbyte to put the data in another schema than you set up in the destination, you could do this by changing these parameters. - Non-breaking schema updates detected
Comparable to the changes that you allow Fivetran to make, Airbyte asks you what to do with schema updates. Airbyte only gives two options; ‘ignore’ or ‘disable connection’. These are a bit limited, and I am curious what ‘ignore’ really entails. This might be a blog topic in the future. For now, I leave this on ignore because I don’t expect any schema updates in my demo environment.
Once everything is setup, we start the sync.
Conclusion
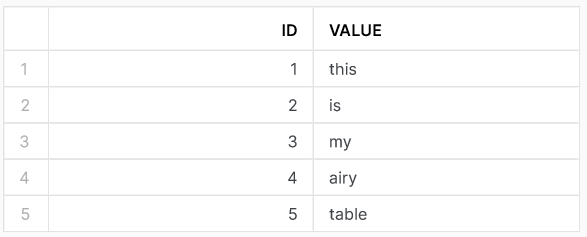
After the initial sync, our database environment in Snowflake has two new tables in the dest schema. When we run the command to see how the airy table looks like, we get the following result below. Airbyte also makes another table airbyte_raw_airy_table. That table has essentially the same data as the other table except that the data is given in JSON format. When you setup the Airbyte connection, there is an option to chose the normalization. Airbyte does the internal pipeline with ‘raw data’ in JSON format. I have checked that Airbyte makes the data in the destination in normalized tabular data. Look at the Airbyte documentation to learn more about this transformation.
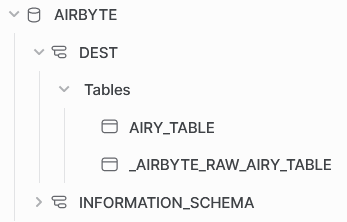

airy_table in dest schema
airbyte_raw_airy_table in dest schemaAlthough most of the setup was straight forward, I have some issues with the granting of privileges for Airbyte. In the Airbyte documentation, they recommend to give the Airbyte roles OWNERSHIP of the source and destination objects. I never want to give ownership to an external role of my Snowflake instance. Not only would they now have all the rights to the object, they can also grant rights to other roles! In this demo, we found a way around giving ownership. Nevertheless, this is really something Airbyte should work on, because no production use case would be comfortable with this privilege setup.